 I’m sharing an extra post this week and — surprise! — it’s a Do It Yourself (DIY) craft post.
Those of you who know that I am craft-challenged have probably fallen on the floor or worse, spewed coffee all over your computer screen. All I can do is apologize and proceed with an explanation.
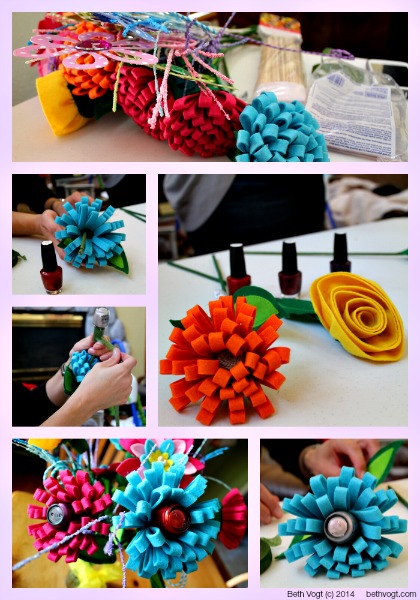
In my recently released eShort novella, You Made Me Love You, the heroine receives an unusual bouquet made of nail polish bottles. Yes, you read that correctly. Meghan is mad about OPI nail polish so the unusal bouquet is most appropriate.
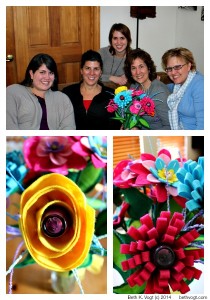
When I planned the Rafflecopter giveaway to celebrate the release of You Made Me Love You, I knew I had to include a nail polish bouquet. And with the help of my oldest daughters and my BFFs, we created a one-of-a-kind bouquet. Today, I’m going to tell you (and show you) how we did it.
How to Create a Nail Polish Bouquet
Supplies:
- Nail polish bottles – we used 6 bottles of OPI nail polish
- Artificial flowers of your choice – which we disassembled
- Additional flowers for filler
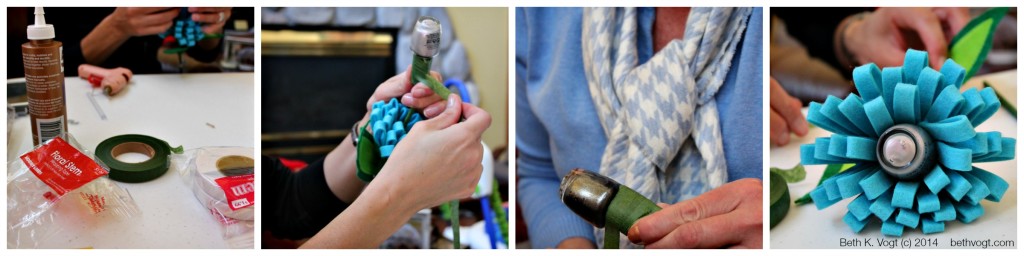
- Green and/or white floral stem wrapping tape – we only used the green
- Bamboo skewers
- Glue gun
- Scissors
- Wire cutters
- Vase/ribbon to display your bouquet when done
- (Beverage of choice to celebrate when you’re done)
Time frame: It took us one hour from start to finished bouquet with 3 people and one photographer – and one person who arranged the bouquet to make sure we got it right. We shopped for supplies earlier.
- Purchase your nail polish. Hint: We purchased OPI nail polish on sale. According to their rep, OPI polish lasts for two years if it is unopened and stored in a cool, dark place.
- Coordinate your artificial flowers – both the main stems and the fillers – to the nail polish bottles. Hint #1: Dainty flowers won’t work. The flowers must support the weight of the nail polish bottles. Hint #2: Remove the label from the bottom of the bottle and affix it to the top of the lid so the recipient knows what colors she receives. You could also print out a list with the name of the nail polish next to a swipe of the polish.
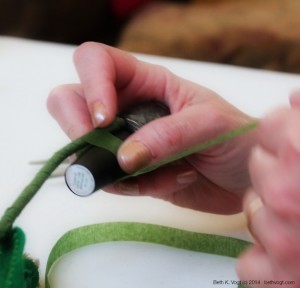
- Remove center of the flower and the stem. This creates a space for the nail polish bottle cap. Once the cap is pushed through the opening, the base of the nail polish
 bottle becomes the center of the flower.
 - Once the center is cut out of the flower, allow the flower to slide down the stem, exposing the tip of the stem so that you can tape the nail polish bottle to them stem.
- Wrap the bottle cap in green floral stem wrapping tape. Do one initial wrap around the cap. Then attach the stem of the flower to the cap. And then wrap the stem, attaching it to the cap of the bottle. Start at the base of the cap (near the bottle) and work down toward the top of the cap. Once you reach the
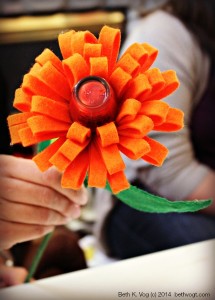 top of the cap, go back up to fully secure the stem to the cap.
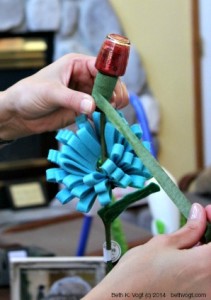
 - Push the bottle down so that the colored portion becomes the center of the flower and the wrapped cap, which is attached to the stem, is below the flower petals.
- If needed, secure the base with hot glue and additional floral stem wrapping tape. (We didn’t need to do this.)
- Arrange your flowers, adding accent flowers/floral picks as desired. We separated two floral picks and then secured them to several bamboo skewers with green floral stem wrapping tape.
You can read about Meghan and her nail polish bouquet in You Made Me Love You, which is available for only 99 cents on Amazon Kindle. Want a sneak peek of my upcoming May release, Somebody Like You? There’s a chapter included with the novella!
How to create a nail polish bouquet Click to Tweet
DIY: the nail polish bouquet from You Made Me Love You Click to Tweet
Comments 4
I think I am amazed (thankfully wasn’t drinking coffee at the time). What a clever idea. I won’t do, but I’ll bet my oldest granddaughter would love to do and will show her. How fun!
Author
It was quite a lot of fun! I think the most important part is finding the right flowers to work with. Shari Hamlin did a great job picking some really fun ones to work with.
Beth, I was wondering how these were made when reading your novella. Cute idea!
Author
🙂 Thanks, Andrea. Seth couldn’t give her a regular bouquet, could he?